Today, let’s dive into the world of Appium! In a nutshell, Appium is a versatile, open-source tool designed to cater to your cross-platform mobile application testing needs. Its primary objective is to enable you to test your applications across various devices thoroughly. What makes Appium truly remarkable is its capability to automate testing for native, web, and hybrid mobile applications. You can use Appium to streamline your testing process across Android, iOS, and Windows desktop platforms. So, if you’re looking for a powerful solution to enhance your mobile app testing, Appium has got you covered.
Key Features of Appium
1. Versatile Application Testing: Appium offers the flexibility to test all three types of mobile applications – native, hybrid, and mobile web – ensuring comprehensive test coverage for your projects.
2. Device Flexibility: Appium empowers users to run automated tests on a wide range of devices, including physical devices, simulators, and emulators, enhancing test coverage and reliability.
3. Open Source: Appium is completely free and open-source, making it accessible to a broad community of developers and testers.
4. Cross-Platform Compatibility: Appium is a cross-browser platform, allowing you to test applications on various operating systems, such as Android, iOS, and even Windows, simplifying cross-platform development and testing.
5. Integration with Automation Tools: Appium seamlessly integrates with various automation testing tools, making it effortless to incorporate into your existing testing workflows and aiding in the smooth migration of projects.
6. Vibrant Community Support: With a large and active user community, Appium provides a wealth of resources for debugging, troubleshooting, and resolving any concerns or bugs that may arise during your testing endeavors.
These features collectively make Appium a robust and dependable choice for mobile application testing across diverse environments and scenarios.
Appium is a powerful mobile application automation tool that functions through a client-server architecture and consists of several core components. Here’s a detailed explanation of how it works:
1. Client-Server Architecture: Appium operates on a client-server architecture. The client is typically your test script or testing framework, while the server is the Appium Server. This architecture facilitates communication and coordination between the testing script and the mobile device or emulator.
2. Appium Server: The Appium Server is a Node.js-based web server that exposes RESTful APIs. It acts as the core of the automation process. It receives and processes commands and requests from the client and interacts with the native frameworks provided by platform vendors (such as Google or Apple) to control the mobile application.
3. Appium Client: Appium supports multiple programming languages and frameworks (e.g., Java, Python, JavaScript), allowing you to write test scripts in your preferred language. These test scripts, acting as clients, send commands to the Appium Server to control the mobile device or emulator.
4. Session: In Appium, each interaction with a mobile application occurs within the context of a session. A session represents a testing session initiated by the client. Sessions are established and managed using a set of parameters known as “desired capabilities.”
5. Desired Capabilities: Desired capabilities are a set of key-value pairs that specify the desired behavior and configuration for the automation session. These capabilities include details about the target device, platform, application, and other settings necessary for the test. Desired capabilities help Appium connect to the appropriate mobile device or emulator and configure it accordingly.
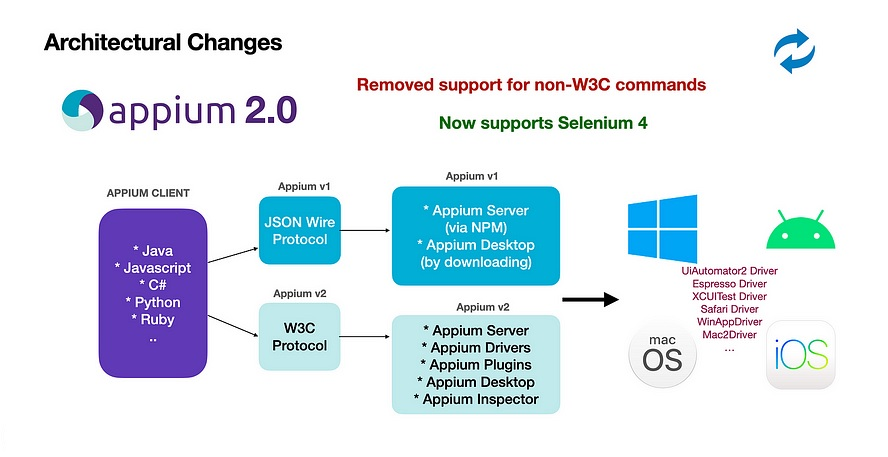
Exciting new features of Appium 2.0
Here’s a step-by-step overview of how an Appium automation session works
- The Appium Server is started and configured with the desired capabilities provided by the client.
- The client initiates a session with the Appium Server, specifying the desired capabilities for the test.
- Within the session, the client sends automation commands (e.g., “tap,” “swipe,” “click”) to the Appium Server.
- The Appium Server translates these high-level commands into platform-specific automation commands that the mobile device or emulator can understand.
- The device or emulator executes the actions specified by the commands, interacting with the mobile application.
- The Appium Server captures the results of these actions and communicates them back to the client, typically in the form of JSON responses.
- The client can then analyze the results, make assertions, and perform additional actions based on the test outcomes.
This comprehensive client-server interaction, facilitated by desired capabilities, ensures that Appium can automate testing on a wide range of mobile devices and platforms, providing a unified and flexible testing framework for mobile application development.
To successfully run Appium for mobile application automation, you need to set up certain prerequisites and perform installations. Below are the key prerequisites and installation steps:
1. Node.js: Appium is built using Node.js, so you’ll need to install Node.js on your system. You can download it from the official website: [Node.js](https://nodejs.org/).
2. npm (Node Package Manager): npm comes bundled with Node.js and is essential for managing Node.js packages and dependencies. After installing Node.js, npm should also be available on your system.
3. Java Development Kit (JDK): Appium relies on the Java Development Kit (JDK) for Android automation. You can download and install the JDK from the official Oracle website or choose an open-source version like OpenJDK.
4. Android Studio (For Android Testing): If you plan to automate Android applications, you’ll need to install Android Studio, which provides the Android SDK and emulators. Configure Android Studio to install the necessary SDK components and create emulators for testing. Ensure that you have the Android Virtual Device (AVD) manager set up.
5. Xcode (For iOS Testing): For iOS application testing, you need Xcode, which is available on macOS. You should also install Xcode Command Line Tools.
6. Appium Server: Install the Appium Server globally on your system using npm. You can do this by running the following command in your terminal or command prompt:
npm install -g appium
7. Appium Clients: Depending on your preferred programming language, choose the appropriate Appium client library (e.g., Appium-Python-Client, Appium Java-Client, Appium Ruby-Client, etc.). These client libraries allow you to write test scripts in your desired language. Install the selected client library using the package manager for your language (e.g., pip for Python, gem for Ruby, Maven for Java).
8. IDE or Code Editor: You may choose to work with an integrated development environment (IDE) or a code editor of your choice, such as Visual Studio Code, IntelliJ IDEA, or Eclipse, to write and manage your test scripts.
9. Mobile Device or Emulator Setup: Ensure you have access to the mobile devices or emulators you intend to test on. Configure emulators or connect real devices to your development machine.
Once you have these prerequisites in place, you can start writing Appium test scripts and running them to automate mobile application testing.
Please note, that the specific installation steps may vary depending on your operating system (Windows, macOS, or Linux) and your chosen programming language. Consult the official documentation for each component and library for detailed installation instructions and any platform-specific considerations.
Appium is a powerful mobile automation tool, but like any software, it has its limitations. Here are some of the limitations associated with Appium:
- Minimum Android Version Requirement: Appium does not support testing Android versions lower than 4.2 (Jelly Bean). If you need to test applications on older Android devices, you may encounter compatibility issues.
- Limited Hybrid App Testing Support: While Appium does support testing hybrid applications (which combine web and native components), there can be limitations in handling complex switching actions between web and native contexts. This can make certain scenarios challenging to automate.
- No Support for Inspector on Windows: As of my last knowledge update in September 2021, the Appium Inspector, a graphical user interface for inspecting mobile app elements, was not officially supported on Microsoft Windows. However, this limitation might have changed with updates to Appium after that time.
It’s important to note that the Appium project is actively developed, and many limitations or issues may have been addressed or improved in newer versions since my last update. Therefore, it’s advisable to consult the official Appium documentation and release notes for the most up-to-date information regarding its capabilities and limitations. Additionally, community-contributed tools and plugins may offer workarounds for some of these limitations.
It’s great to see your interest in getting started with Appium for mobile application automation. The code snippet you provided is a good starting point for installing and opening an application on an Android emulator using Appium. Let’s break down the code and provide some additional context:
Java Code to get started:
import io.appium.java_client.android.AndroidDriver;
import org.openqa.selenium.remote.DesiredCapabilities;
import java.io.File;
import java.net.MalformedURLException;
import java.net.URL;
public class AppiumBasic {
    AndroidDriver driver;
    public void testAppium() throws MalformedURLException, InterruptedException {
        // Define the path to the APK file you want to install
        File file = new File("/home/knoldus/Desktop/appium/apk/ApiDemos-debug.apk");
        // Set desired capabilities to configure the test environment
        DesiredCapabilities capability = new DesiredCapabilities();
        capability.setCapability("deviceName", "appiumEmulator");
        capability.setCapability("platformVersion", "9");
        capability.setCapability("platformName", "Android");
        capability.setCapability("app", file.getAbsolutePath());
        // Create an AndroidDriver instance by specifying the Appium server URL and desired capabilities
        driver = new AndroidDriver(new URL("https://127.0.1.1:4723/wd/hub"), capability);
        // Wait for 10 seconds (you can adjust this as needed)
        Thread.sleep(10000);
        // Quit the driver to end the test session
        driver.quit();
    }
}
As I explained above, this code can be divided into two main parts:
1. Desired Capabilities:
- In this section, you define the desired capabilities that specify the test environment for Appium. Key capabilities include:
- deviceName: The name of the device or emulator you want to use.
- platformVersion: The Android version of the device or emulator.
- platformName: The platform you are testing (in this case, “Android”).
- app: The path to the APK file you want to install and test.
2. Android Driver:
- Here, you create an instance of the `AndroidDriver` class provided by the Appium Java client library.
- You pass two arguments to the constructor:
- The URL of the Appium server where Appium is running. In this example, it’s “http://127.0.1.1:4723/wd/hub.”
- The desired capabilities object you defined earlier.
- After initializing the driver, you can interact with the emulator/device and the installed application.
Before running this code, you should ensure the following prerequisites:
- Start and ensure that the Appium server is running.
- Have an Android emulator or a real Android device available for testing.
- Ensure that the APK file you want to test exists at the specified path.
Finally, you can adjust the `Thread.sleep` duration as needed based on your specific testing requirements (it’s a static wait; however, this is just for showing you here, but we can add a dynamic wait mechanism, too). It’s essential to understand that these sleep statements should ideally be replaced with more robust synchronization mechanisms for more reliable automation scripts in real-world scenarios.
Thanks for reading my blog; if you have any further questions, need clarification, or have feedback, please feel free to reach out. You can either email me or leave a comment. I’m here to assist you. Good luck with your Appium journey!