ListVar is the most powerful variable in Adobe Analytics. So, we have eVars and props as well to store the data but due to their character limit 100 char for prop and 250 char for eVar, there might be chances of value truncation in case of large data.
ListVars are custom variables that you can use however you’d like. They work similarly to eVars, except they can contain multiple values separated by a delimiter (commonly pipe symbol “|”) in the same hit. List variables can hold 250 delimited values at one time for each visitor, each value of which can hold up to 255 bytes. That’s like 250 eVars put together in a single variable separated by a delimiter!!
Example:
If on home page we’re collecting A1,B1,C1 as values in listVar1 and on next page or say event we’re collecting values like A2,B2,C2 and followed by X1,Y1,Z1 on next event then overall allocation for listVar1 for that particular Visitor will be (A1,B1,C1,A2,B2,C2,X1,Y1,Z1).
Being such a powerful variable, we have a limited number of listVars, i.e., only 3 (ListVar1/ListVar2/ListVar3)
To collect data in ListVars via Web-SDK we need to follow only 2 steps:
- Configure ListVars in Adobe Analytics Admin Console.
- Map ListVars in your data collection via custom code or direct allocation.
Configure ListVars in Adobe Analytics Admin Console
Admin > Report Suite > Select desired RS > Edit Settings > Conversion Variables > List Variables
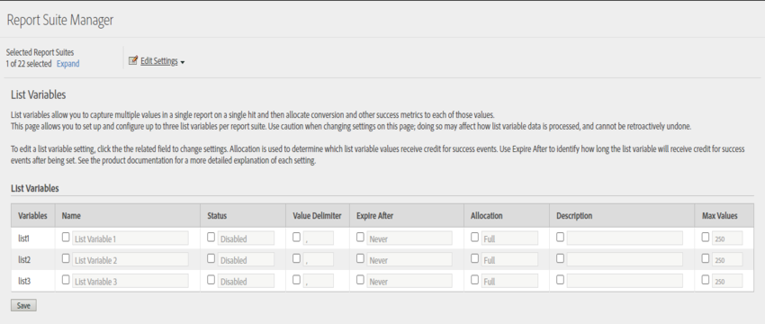
Configure each list variable based on the requirement. Every field is editable. Once we have configured everything here, and enabled desired listVars, Click Save and Exit.
Map ListVars in your Data collection
Open Data Collection > Select Desired property > Data Elements > Select Master XDM Data Element > Edit
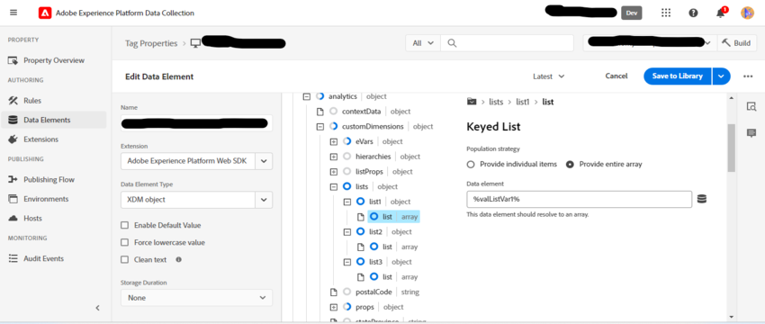
In the list Field, map three different data elements which are configured as below and eventually those values get mapped with listVar1/listVar2/listVar3 respectively.
Example code for data elements “dl.modifiedValueForList1” to be mapped here, use similar format for other two data elements as well say “dl.modifiedValueForList2”/ “dl.modifiedValueForList3”.
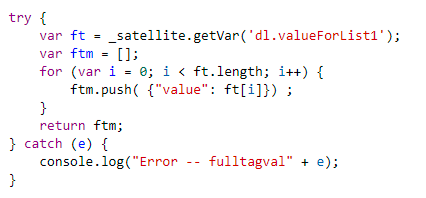
Code for “dl.valueForList1” is mentioned below, use similar format for other two data elements (dl.valueForList2/dl.valueForList3) as well.
Custom Implementation
Map below code in Master XDM Data Element which is used to trigger event like “page view/ from submit/ CTA click”

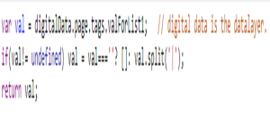
NOTE: Here “valueForList1/valueForList2/valueForList3” are data elements that fetch value from data layer and break each value based on delimiter and assign it into an array.
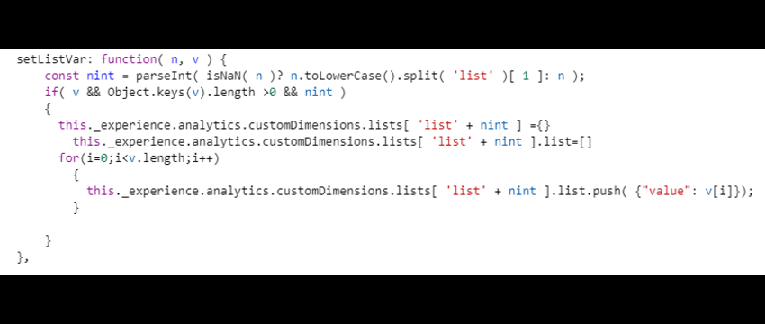
Code for “valueForList1” is mentioned below, use similar format for other two data elements as well.
Create a function in “_experience (websdk)” or similar data element to map values.
Conclusion
Using above-mentioned code and mapping strategy, we can collect data in listVars wherever we want to, be it page view/ form Submit/ Click to action events or any other. So in any rule wherever your master XDM data element is mapped, based on that rule’s condition listVar’s data is being collected.
Keep following us for more such updates. Happy Tagging!