Docker has gained a lot of attention these days. The main reasons which we know of are that it saves a lot of resources & one can have n number of environments within one server/machine. It being platform independent, is one more plus point for using docker & hence is one of the fastest growing technologies.
In this blog we will go ahead & setup WordPress (PHP) using docker containers in a very simple way & also make use of system volumes. Considering the fact that you have installed docker on your machine we would now start to learn about how to setup the WordPress site via docker.
There are basically 3 steps to setup the WordPress site which are as follows :-
1. Use the system volume of your local machine or server for data related container, for example a MySQL container which we will be using here. What we want is even if the container terminates the data remains in stack. In /var/lib/docker you will see volumes. Every time an container is started it goes to this very directory if volumes is defined for the container. Also helps sharing of same file system between two containers.
Just for your reference this is what we are trying to achieve:-
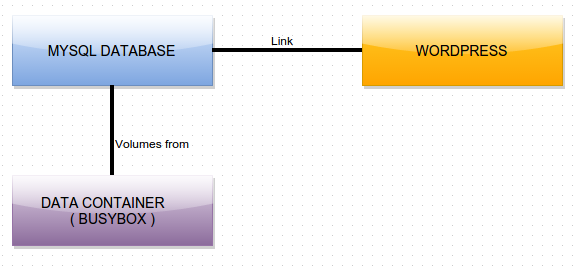
We will use Linux distribution busy box for this. Busy Box is software that provides several stripped-down Unix tools in a single executable file. It runs in a variety of POSIX environments such as Linux.
(source : wiki )
run -> docker run -v /var/lib/mysql –name=my_data_container -d busybox
This will start a container & create a volume which we will be using later. Also, the thing to remember is that data containers need to be started only once. Inspect the container & you will see something like below :-
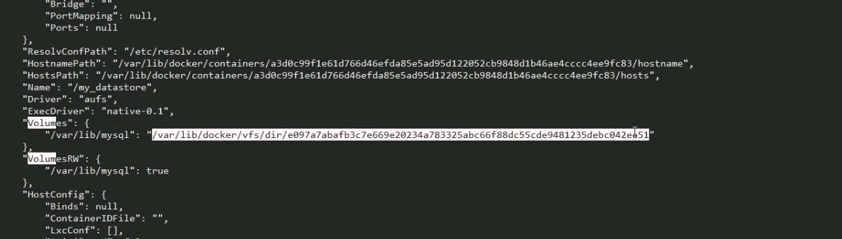
So you can go to /var/lib/docker & there will be entries inside vfs & volumes.
2. Now, we need to create our MySQL container for WordPress site which will be needing it. For that we can use the MySQL image available in docker registry.
run -> docker run –name my_mysql -e MYSQL_ROOT_PASSWORD=root –volumes-from my_data_container -d mysql
-e is an environmental variable which will be used to define the root password in this case. You can add –volume-from my_data_conatiner if you want the MySQL to use the volume we created earlier.
run -> docker ps & you will see something like this :-
![]()
Now, your MySQL container is up & ready.
If you inspect this container -> docker inspect my_mysql you will see that it is using the data store we created earlier.
To access the MySQL shell you may
run -> docker exec -it my_mysql bash
3. For the WordPress container & linking it to the my_mysql container do as follows :-
run -> docker run –name wordpress –link my_mysql:mysql -p 80:80 -d wordpress
This will pull the WordPress image from docker registry, link the MySQL of WordPress container to the MySQL container that we created in step 2, map port 80 of host machine to port 80 of the WordPress container & run the WordPress container. Now, simply go & hit port 80 of your localhost or your server & the WordPress site should be up & running.
In my next blog we would be setting up the WordPress image manually rather than pulling it from docker registry which will give us a better overview of docker containers. Also, we would try to integrate it with ECS which is Amazon Web Services’s latest addition to its services list so as to support docker.
Pingback: Setting up sendmail inside your Docker container | TO THE NEW Blog