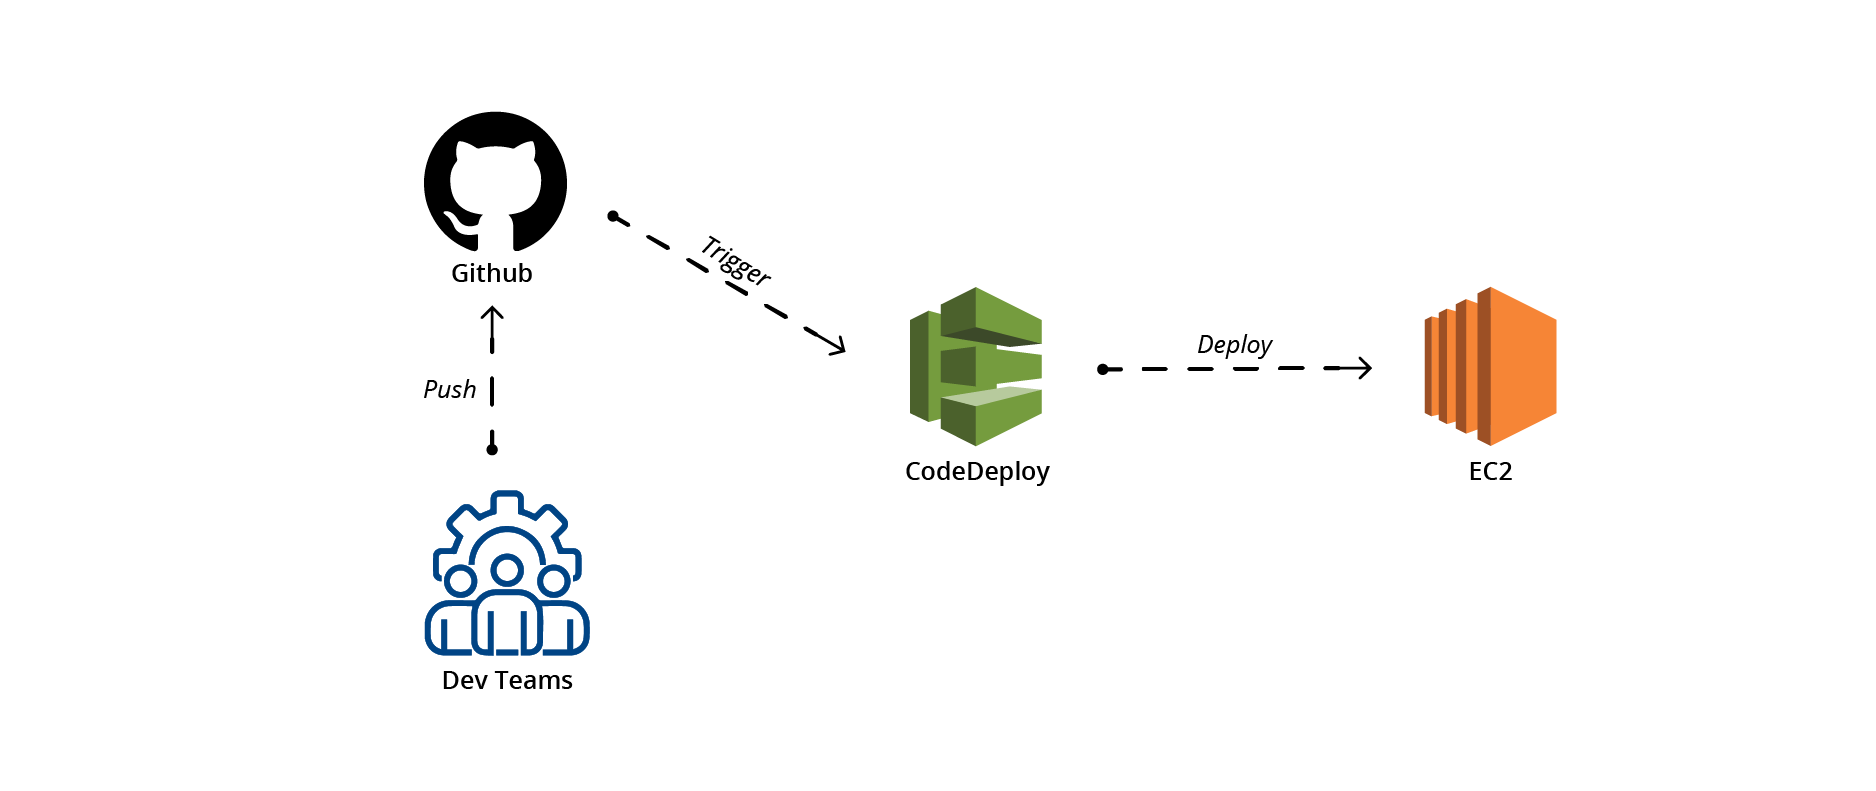
The much talked about AWS CodeDeploy is being used as a daily deployment tool. According to AWS “AWS CodeDeploy coordinates application deployments to Amazon EC2 instances, on-premises instances, or both. (On-premises instances are physical devices that are not Amazon EC2 instances.)”
On-premise support came in mid-2015. AWS CodeDeploy has been the choice of many since a long time and we are going to talk about it in this blog.
Use-case
I had to automate my deployment process. I came across AWS CodeDeploy and it helped me to deploy my new code with ease and simplicity. We will go through the basic setup of CodeDeploy service, installation of CodeDeploy agent on a server (AWS EC2 instance) and deployment of new code from GitHub onto it. CodeDeploy is a region level service and in this, we will talk about deployment in the Virginia region. For using it in any other region, you have to make just a few changes in endpoints which is simple too.
Prerequisites
- An AWS EC2 instance with IAM role attached. If you don’t have a role attached to your EC2 instance, then you will have to launch a new EC2 instance with an attached role from an AMI. For now, you can just attach a blank role, and I will tell you later in the blog about what permissions policy to attach.
- Access to GitHub repository where the code is present
- AWS IAM role for the AWS CodeDeploy Service
- Appspec file and scripts which we will talk about shortly
The above image shows the various stages and event hooks during a deployment using CodeDeploy. We define what CodeDeploy should do during all these events in a file called appspec.yml as mentioned in the prerequisites.
Appspec file needs some scripts along with it to work. Let’s look at a simple appspec.yml file:
[js]
version: 0.0
os: linux
files:
– source: /
destination: /home/xxuserxx/xxcodedirectoryxx
hooks:
BeforeInstall:
– location: apache_stop.sh
timeout: 300
runas: root
AfterInstall:
– location: afterinstall.sh
timeout: 300
runas: root
ApplicationStart:
– location: apache_start.sh
timeout: 300
runas: root
[/js]
Above shown is the way you define various event hooks along with source ( the destination in the Git repository from where you want the code to be deployed, “/” means the root directory of the repo) and destination ( the location on the server where the new code has to be placed). Each hook has a script associated with it.
Link to various Hooks:
For this example, I have just used scripts for BeforeInstall, AfterInstall, ApplicationStart.
BeforeInstall:
In BeforeInstall I have used a script (apache_stop.sh) which will run before the install step i.e. before CodeDeploy puts the code to GitHub onto a node.
[js]
#!/bin/bash
#Stop apache service before deploying new code
service apache2 stop
mkdir -p /home/ubuntu/code
tar -vczf /home/sap/betasite-git-backup.`date`.tar.gz /home/xxuserxx/xxcodedirectoryxx
#Copy current code to a directory
[/js]
This script will firstly clears the root directory where the older code is present. Reason being that CodeDeploy needs a clean directory where it has to deploy the code. Before cleaning the directory, it will also make a backup of the files. You can do any relevant changes in this step depending on your application like stop Apache or Tomcat etc. which would you need to do before the code is deployed.
After this, the Install hooks is run by AWS CodeDeploy itself where it pulls the new code from the Git Repository and places it in the destination directory.
AfterInstall:
Now, that CodeDeploy has placed the new code in the directory we asked it to, we can perform actions after it like compiling the code. For e.g. compiling CSS files or running some integrity tests:
[js]
cd /home/xxuserxx/xxcodedirectoryxx
npm install
#GULP COMMANDS
gulp scss
gulp cpk-scss
gulp compile
[/js]
ApplicationStart:
Here, I have simply added a command that will start apache and check whether it is running or not. If Apache fails to start, obviously there are some code issues, and you will be shown an error on the console.
[js]
#!/bin/bash
service apache2 restart
[/js]
Now, that we have the appspec.yml and the scripts handy, just push it along with the code to GitHub.
Remember, appspec.yml should be present in the root directory of your code. and the scripts in a folder named scripts and location of scripts should be correct in appspec.yml
One more important thing before we move onto the console:
AWS CodeDeploy needs a role to be able to access your AWS EC2 instances. Go to IAM and create a role having the following policy:
|
1
2
3
4
5
6
7
8
9
10
11
12
13
14
15
16
17
18
19
|
{"Version": "2012-10-17", "Statement": [ { "Action": [ "autoscaling:PutLifecycleHook", "autoscaling:DeleteLifecycleHook", "autoscaling:RecordLifecycleActionHeartbeat", "autoscaling:CompleteLifecycleAction", "autoscaling:DescribeAutoscalingGroups", "autoscaling:PutInstanceInStandby", "autoscaling:PutInstanceInService", "ec2:Describe*" ], "Effect": "Allow", "Resource": "*" } ] } |
With this, the Trust Relationship also needs to be changed in IAM, and that should now be as follows:
[js]
{
"Version": "2012-10-17",
"Statement": [
{
"Sid": "1",
"Effect": "Allow",
"Principal": {
"Service": [
"codedeploy.us-west-2.amazonaws.com",
"codedeploy.us-east-1.amazonaws.com"
]
},
"Action": "sts:AssumeRole"
}
]
}
[/js]
Now, as I told you above in the prerequisites that the Instances on which we need to deploy the new code needs an IAM role attached to it along with a CodeDeploy agent installed on it. The policy that needs to be given to the role is:
[js]
{ "Statement":[
{"Resource":"*",
"Action": ["autoscaling:Describe*","cloudformation:Describe*","s3:Get*"],
"Effect":"Allow"}] }
[/js]
and Trust Relationship would be:
[js]{
"Version": "2012-10-17",
"Statement": [
{
"Sid": "",
"Effect": "Allow",
"Principal": {
"Service": "ec2.amazonaws.com"
},
"Action": "sts:AssumeRole"
}
]
}[/js]
Let’s install the CodeDeploy agent on the node/nodes now by following the below steps:
[js]sudo apt-get update
sudo apt-get install awscli
sudo apt-get install ruby2.0
cd /home/ubuntu
sudo aws s3 cp s3://aws-codedeploy-us-east-1/latest/install . –region us-east-1
sudo chmod +x ./install
sudo ./install auto
[/js]
CONSOLE STEPS
Steps to perform in the AWS CodeDeploy Console:
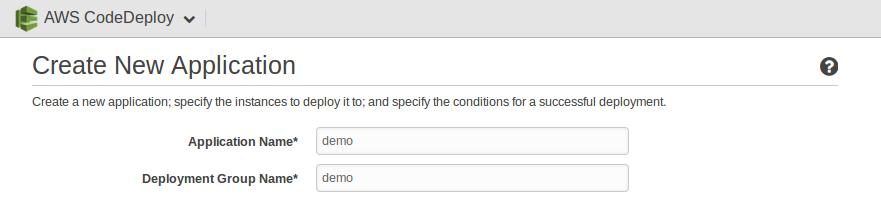
1. Go to AWS CodeDeploy and Select on Create New Application:
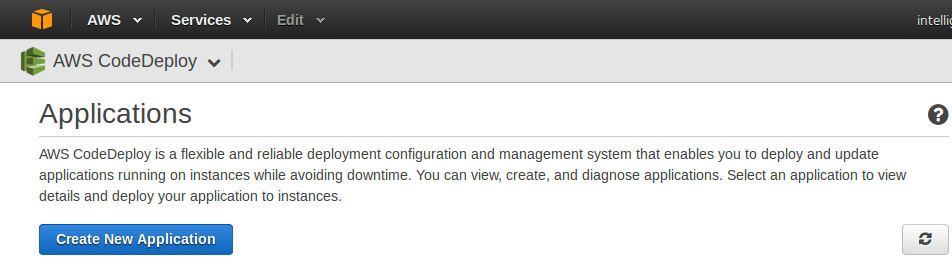
The above will take you to the following page where you need to give a name to your application and enter Deployment Group Name and Deployment Group is a subset of an Application where we add instances on which we want to deploy the code. :
2. Next, choose the Tag you want to use to filter instances to add to a Deployment Group. We can have different Deployment Groups within a single application. We can make another Deployment Group later if needed and deploy different code on both of them. In a single deployment you can deploy code only to one Deployment Group:
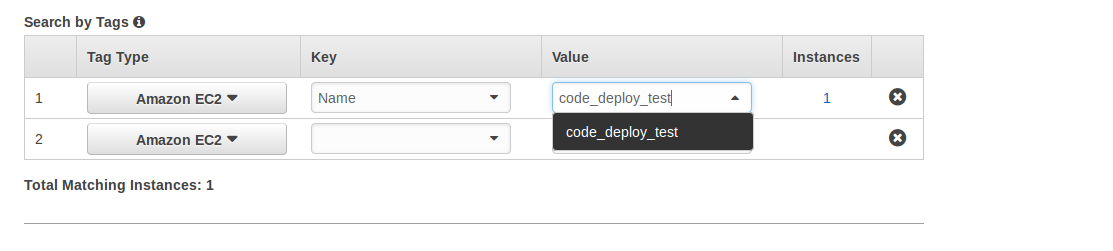
Once that is done, we need to deploy the new code and let CodeDeploy know from where it has to pick up the code and deploy to the deployment group demo that has instance code_deploy_test in it.
3. Next, you can configure the deployment Config (which is an input that tells code deploy about the deployment strategy when you have more than one servers where the code will be deployed):
For e.g., Deploy code to one server at a time:
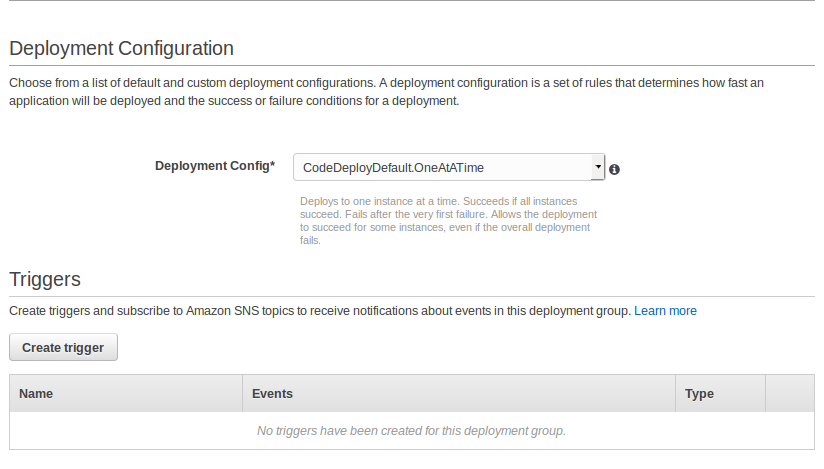
You have other options as well:
Deploy Half at once: Deploys to exactly half of the servers at a time.
Deploy All at once: Deploys to all servers at once.
I prefer one at a time as any error if there is one can be detected early rather than after new code is already deployed to all the servers.
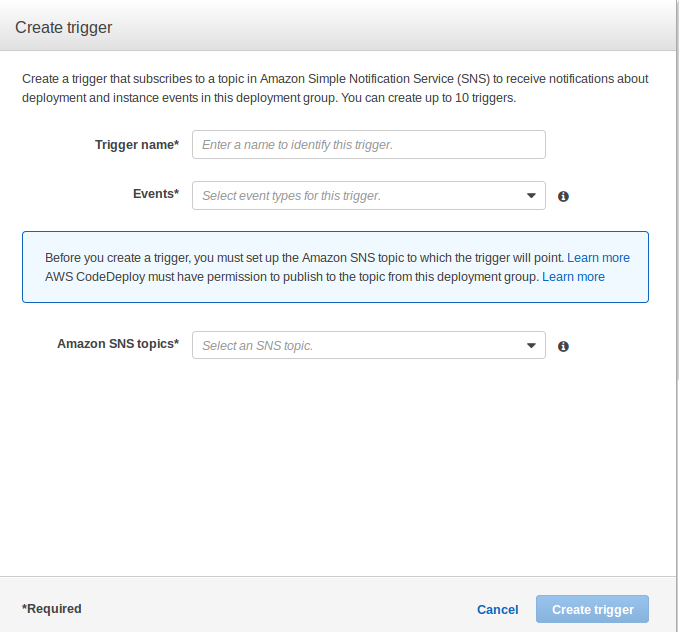
Along with that, you can also create any triggers using “Create trigger”. A simple use-case could be triggering an SNS notification which in turn could perform an action. When you click on create trigger, you would see something like:
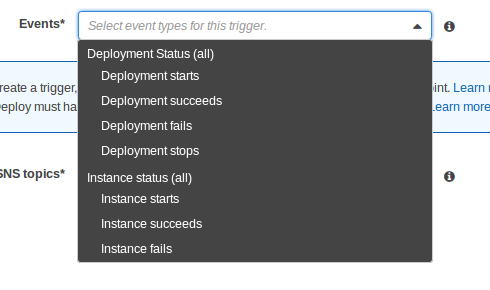
Following are the events triggers that CodeDeploy supports:
After selecting the event just mention the SNS topic and create the trigger. You can create multiple triggers.
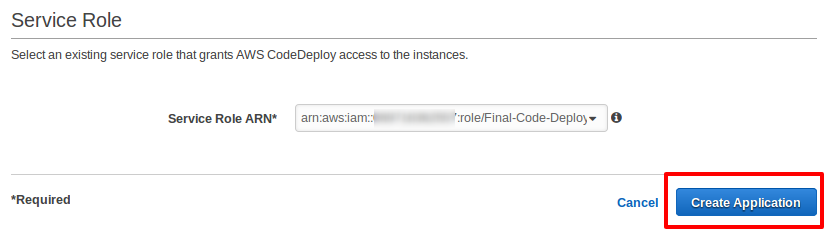
After all that is done, just create the application by clicking on Create Application:
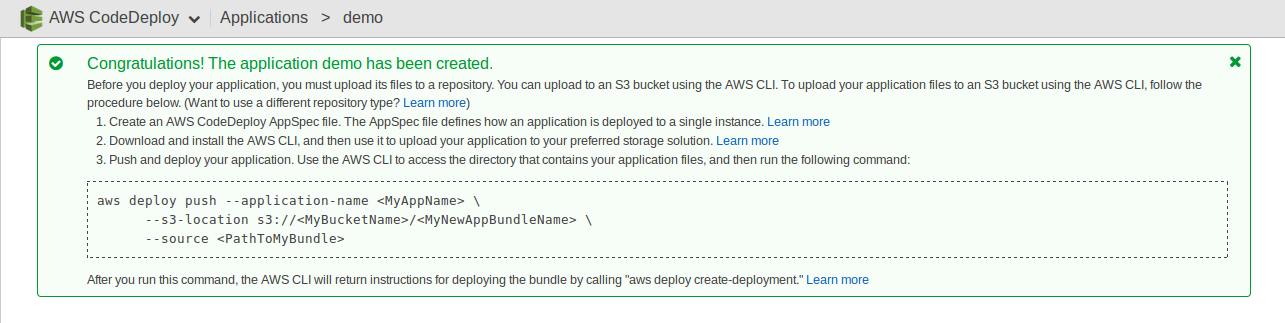
4. Once that is done, you will be directed to a new page, and you should see a message like:
On the same page, you will see Deployment Groups and Revisions:
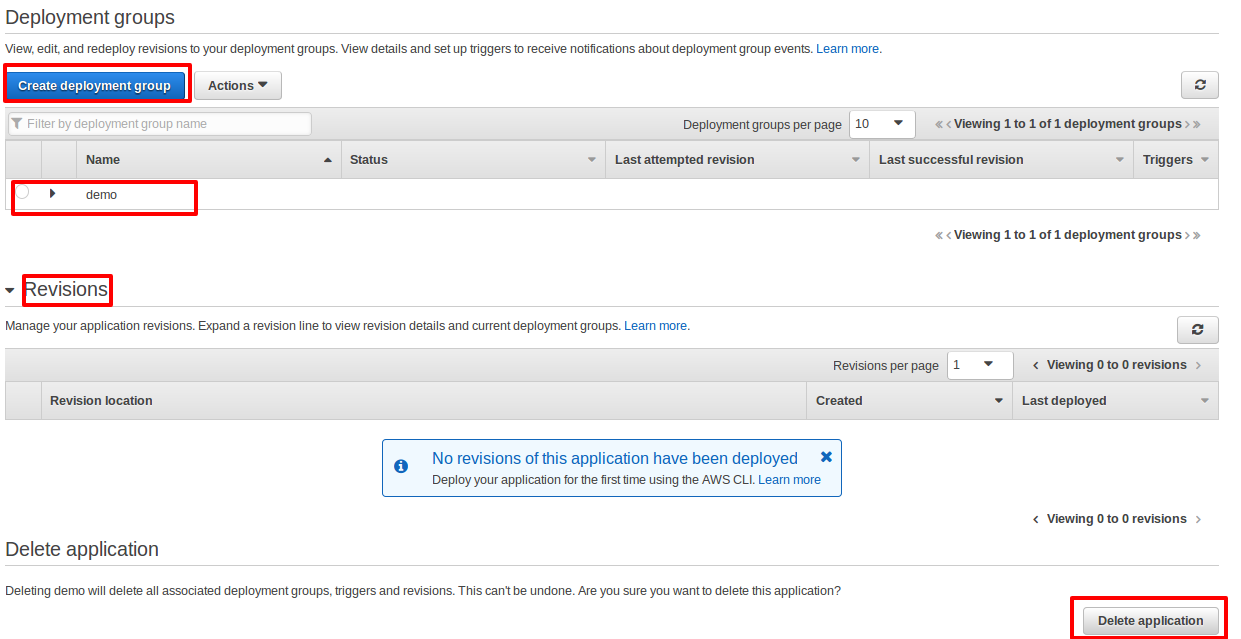
You can create a new Deployment Group by clicking on “Create deployment group“. “Revisions” shows the number of times the code was deployed to this Deployment Group which of course is zero for now. If you have multiple Deployment Groups, just select it and then click on Revisions which will expand any previous deployment details. You can also revert to a previous revision of code by selecting the revision and deploying it to the Deployment Group again. All that said, let’s do our first AWS CodeDeploy deployment.
5. Select the Deployment Group and then go to “Actions” to select “Deploy new revision“:

This will take you to a new page which will look something like:
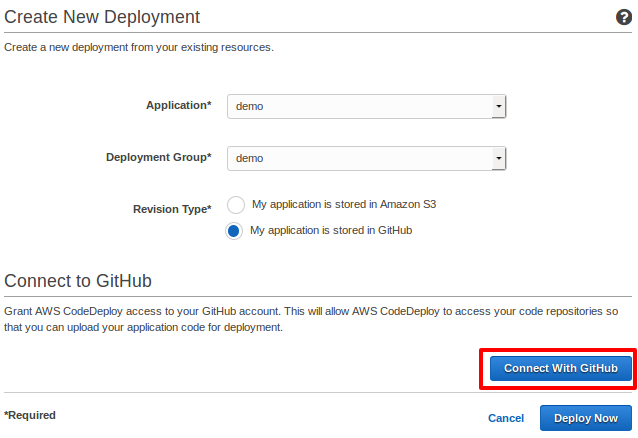
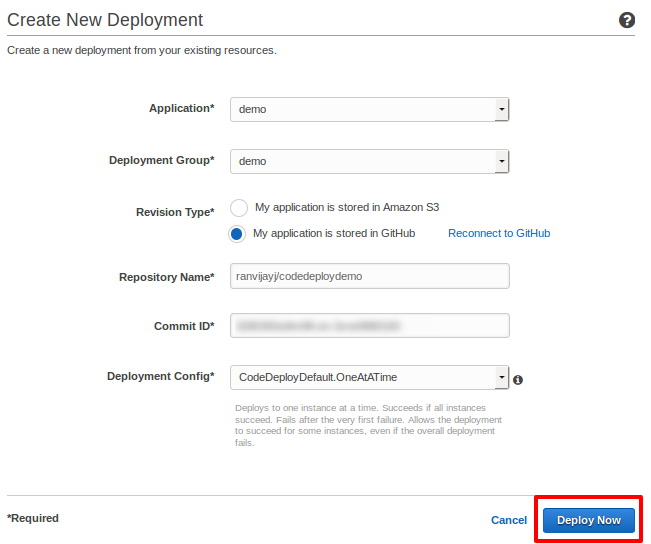
You just need to choose the application, and it’s respective Deployment Group and GitHub in Revision Type. Once you do that, just select “Connect with GitHub“. Doing that will pop up a new browser window, take you to GitHub login where you will have to enter your username and password. After that come back to this page, and you should see something like below. Just enter the remaining details and click “Deploy Now“:
This will take you to a page as follows:
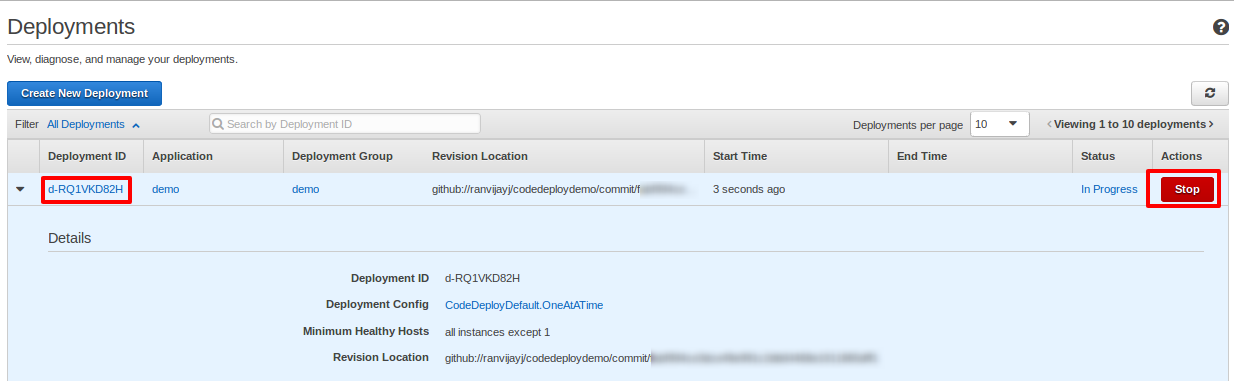
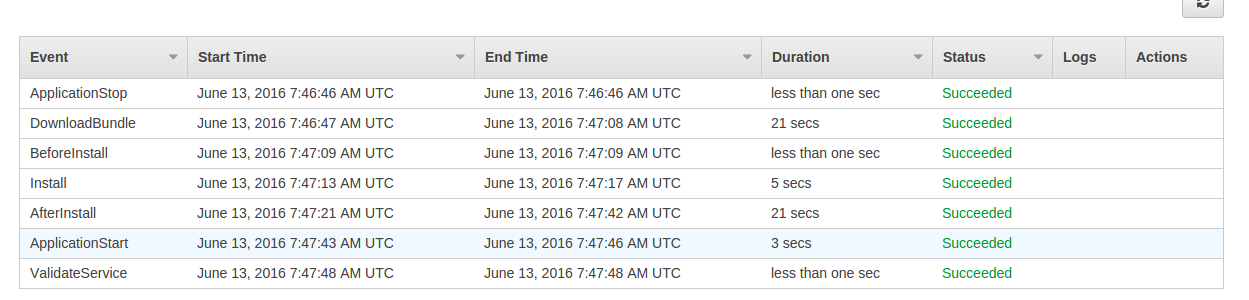
Here you will see details of your current deployment like Deployment ID, Application, Deployment Group, Revision Location, Start Time, End Time, Status, Actions. You can stop your deployment from under the Actions by clicking on STOP. To view the live progress of the deployment just click on the Deployment ID and it will take you to the details page where you will be able to see all the hooks being performed one by one. If the deployment is successfully completed you will see something below on the same page:
6. For a successful job CodeDeploy usually does not give logs but just in case your deployment failed at any step, you can go ahead, check the error log by clicking on “View Logs”, and by clicking on View in EC2 it will do nothing but take you to the AWS EC2 Management Console where and filter out the servers of the deployment group. You can ssh into the servers and check the logs in “/var/log/’ directory. The below image shows what you would see during an error:

Remember you can’t start a deployment again from here itself. You need to go to Deployment Groups page and deploy a new revision.
So, this is how CodeDeploy works and how you can deploy your code easily using CodeDeploy on n number of servers.
You can perform all the above console steps via AWS CLI as well. Read more about it here: AWS CodeDeploy CLI.
For now, automatic rollback is not provided as a feature, and you have to deploy a previous revision through the console manually. To get rid of that, we at TO THE NEW have been able to automate that using AWS Lambda. You can read about that use-case here: Automatic Rollback in AWS CodeDeploy.