Introduction
Instrumented tests run on Android devices, whether physical or emulated. As such, they can take advantage of the Android framework APIs. Instrumented tests, therefore, provide more fidelity than local tests, though they run much more slowly.

Set up your testing environment
In your app’s top-level build.gradle file, you need to specify these libraries as dependencies:
android {
defaultConfig {
 testInstrumentationRunner "androidx.test.runner.AndroidJUnitRunner"
 }
}

dependencies {
 androidTestImplementation “android.test:runner:$androidXTestVersion”
 androidTestImplementation “androidx.test:rules:$androidXTestVersion”
}
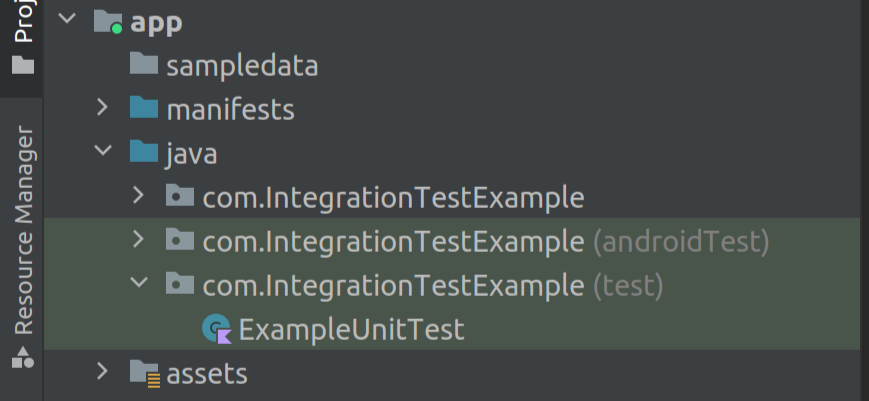
Set up your Folders (test directories)
A typical project in Android Studio contains two directories that hold tests depending on their execution environment. Organize your tests in the following directories as described:
- (androidTest) : The androidTest directory should contain the tests that run on real or virtual devices. Such tests include integration tests, end-to-end tests, and other tests where the JVM alone cannot validate your app’s functionality.
- (test) : The test directory should contain the tests that run on your local machine, such as unit tests. In contrast to the above, these can be tests that run on a local JVM.
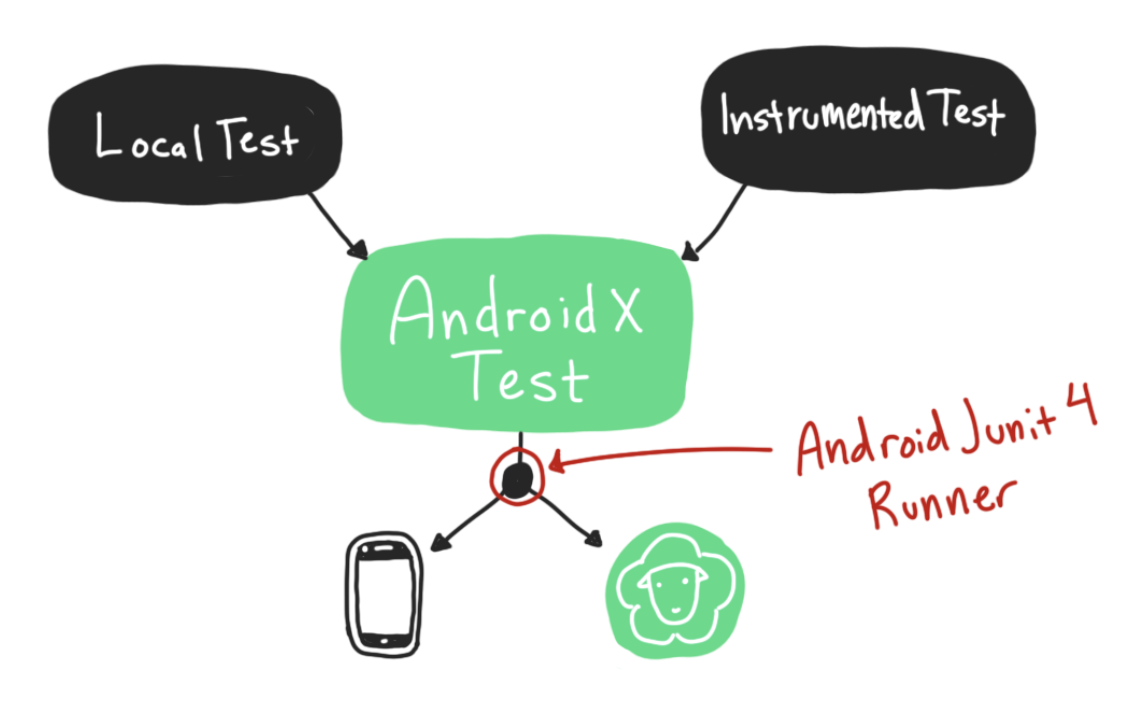
AndroidJUnit4
Now we will integrate AndroidJUnit4 for instrumental testing.
A test runner is a JUnit component that runs tests. Without a test runner, your tests would not run. JUnit provides a default test runner that you get automatically. @RunWith swaps out that default test runner.
The AndroidJUnit4 test runner allows for AndroidX Test to run your test differently depending on whether they are instrumented or local tests.
Testing has three annotation:
1.@Before : this is where all the setup code goes for setting up components like Viewmodel, Repository, database, application context, etc.
2.@Close : this is the place where we close your resources that we will be using for testing like databases ,files etc.
3.@Test : this is where we write our test that we want to check and assert. All the test statements end with Assert.
@RunWith(AndroidJUnit4::class)
class IntegrationTestMLKit {
 private var mSelectedImage: Bitmap? =link null
 private var image: InputImage? = null
 private lateinit var viewModel: SearchViewModel
 private lateinit var repo: DrugRepository
 private lateinit var db: AppDatabase
 private val drugAPI = RetrofitInstance.api

/**
 * setting up the required classes and instances
 */
 @Before
 fun setup() {
 val appContext = InstrumentationRegistry.getInstrumentation().context
  mSelectedImage = getBitmapFromAssets(appContext, “zyrtec.jpg”)
 image = InputImage.fromBitmap(mSelectedImage!!, 0)
 db = Room.inMemoryDatabaseBuilder(
 ApplicationProvider.getApplicationContext(),
 AppDatabase::class.java).allowMainThreadQueries().build()
 repo = DrugRepository(drugAPI, db)// repo instance
 val dataSource = SearchViewModel(repo)//
 viewModel = dataSource
 }
@After
 fun closeDb() {
 db.close() }
/*
* Function to test the Text scanner
 */
 @Test
 fun testTextScanner() {
 val rawValue: MutableLiveData<String> = MutableLiveData<String>()
 val recognizer = TextRecognition.getClient(TextRecognizerOptions.DEFAULT_OPTIONS)
 recognizer.process(image!!)
 .addOnFailureListener { e -> // Task failed with an exception
 e.printStackTrace()
 }
 .addOnCompleteListener {
 if(it.isSuccessful) {
 it.result?.text?.let { itr -> rawValue.value=itr }
 }
 }
 rawValue.getOrAwaitValue()?.let {
 integrateSearchText(it)
 }}
In the above code, we are storing data from TextRecognition in the rawValue Livedata. InstrumentationRegistry.getInstrumentation().context is used to provide the context of the application that all the components can use. rawValue.getOrAwaitValue() : getOrAwaitValue() is a function for live data that waits until the Livedata (rawValue) has a value inside it.
/**
 * checking the scanned text has any response with api, if
 * so we are matching the scanned text with actual drug
 */
 private fun integrateSearchText(text: String) {
 var result: String
 val expected = “cetirizine hydrochloride”
 println(“text $text”)
 viewModel.getapproximateTerm(text)
 viewModel.suggestionList.getOrAwaitValue().let {
 result = it.suggestionGroup.sulinkggestionList.suggestion.toString()
 result = result.drop(1).dropLast(1)
 }
 println(“api $result”)
 assert(result.contains(expected))
 }
In the above function integrateSearchText(text: String), we are checking the response we are getting from suggestionList api call and matching it with the expected result. The assert function is used to check if the test passed or failed.
getOrAwaitValue(): live data extension function
Below is the implementation of getOrAwaitValue() function. You can change getOrAwaitValue as per your requirement.
import androidx.lifecycle.LiveData
import androidx.lifecycle.Observer
import java.util.concurrent.CountDownLatch
import java.util.concurrent.TimeUnit
import java.util.concurrenapp/build/reports/androidTestst.TimeoutException
/**
this class is created for observing Live data
 */
fun <T> LiveData<T>.getOrAwaitValue() : T{
 var data: T? = null
 val latch = CountDownLatch(1)
 val observer = object : Observer<T> {
 override fun onChanged(t: T) {
 data = t
 this@getOrAwaitValue.removeObserver(this)
 latch.countDown()
 }
 }
 this.observeForever(observer)
 try {
  if (!latch.await(18, TimeUnit.SECONDS)) {
  throw TimeoutException(“Live Data Never gets its value”)
  }
 }
 finally {
 this.removeObserver(observer)
 }
 return data as T
}
This is a fairly complicated method. It creates a Kotlin extension function called getOrAwaitValue which adds an observer, gets the LiveData value, and then cleans up the observer — basically a short, reusable version of the observeForever code shown above. Read the link below for more information link.
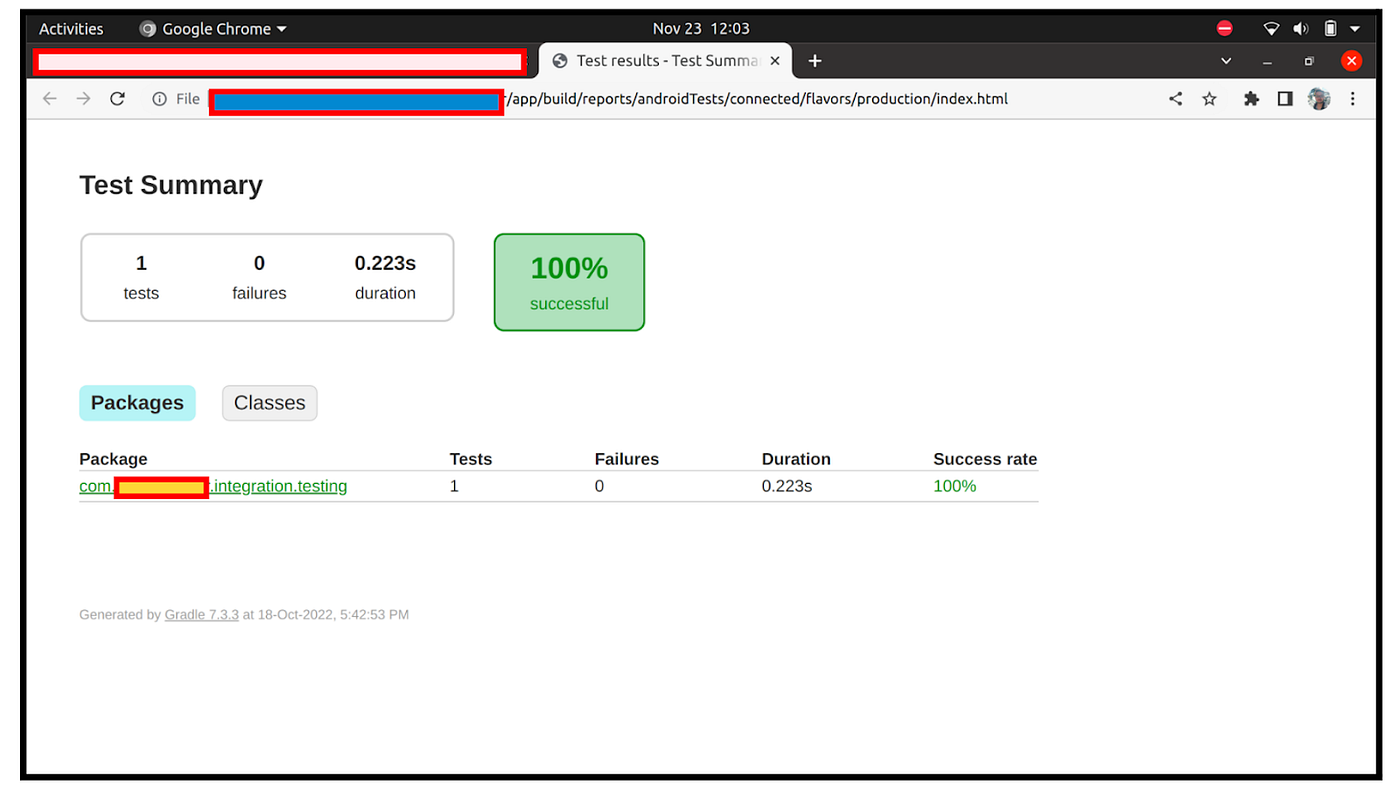
Test Result
The results of the tests are stored in the app/build/reports/androidTests folder.
Inside the folder, you will find an index.html file.
Inside index.html you will find a Test Summary of all the tests that you have executed.
Conclusion
Testing an android application was a tough task, but with the help of AndroidJUnit4, we can quickly write test cases for our android application.
Read this link to set up and understand what testing architecture we should follow.