In continuation with our last blog on Commerce framework, now we will be installing Magento 2 and setting up the Venia store.
Adobe Commerce will work as a Commerce engine, as shown in the previous blog here. Adobe Commerce serves paid as well as community (Open-Source) editions. We will concentrate on the latter. There are multiple approaches to installing Magento in the local environment.
Here are the steps we have followed for the same:
Prerequisites
Note: Use the table mentioned on the Adobe site to get detailed information of the version according to the system. https://experienceleague.adobe.com/docs/commerce-operations/installation-guide/system-requirements.html
-
Apache 2
-
- Using the following command, verify if Apache 2 is already installed.
apache2 -v - If not installed, then follow the below steps to install it,
sudo apt-get updatesudo apt-get install apache2 - Apache 2 Configuration changes
-
- Open /etc/apache2/apache2.conf file in any editor and search for /var/www/ Directory and change AllowOverride None to AllowOverride All
- Install rewrite module
sudo a2enmod rewrite(After executing the command, restart the Apache server, systemctl restart
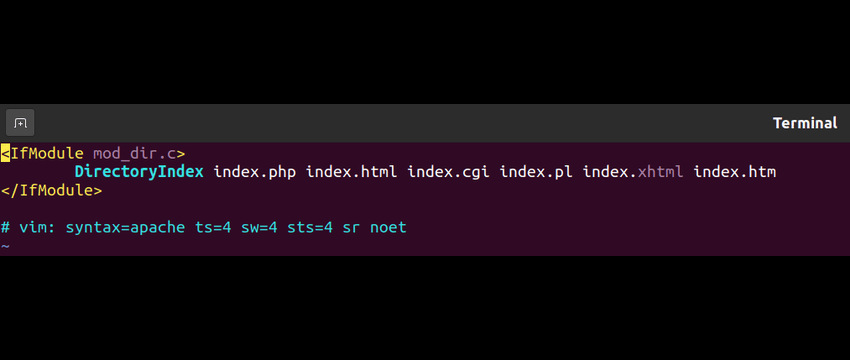
apache2) - Since we will be working with PHP in this, the entry point or the homepage will be pointing to index.php. Hence it has to be prioritized first on the Apache server. To do that, edit the /etc/apache2/mods-enabled/dir.conf file and reorder the index.php.
-
- Using the following command, verify if Apache 2 is already installed.
-
-
PHP and Libraries
- Check if you have PHP already installed on the system. Below is the command to verify, php -v
- If not installed, follow the below steps to install it,
-
sudo apt-get update - We are installing PHP version 8.1,
sudo apt install php8.1 libapache2-mod-php php-mysql
-
- Now that PHP is installed, its time to install libraries/modules, using below command to do so,
sudo apt install php8.1-bcmath php8.1-intl php8.1-soap php8.1-zip php8.1-gd php8.1-json php8.1-curl php8.1-cli php8.1-xml php8.1-xmlrpc php8.1-gmp php8.1-common
-
Elastic Search
Elasticsearch is a free, open-source search and analytics engine based on the
Apache Lucene. Installing this has become mandatory, as in the latest version of Magento, the catalog search makes use of it. Before starting with the below steps, make sure java is installed on the machine, as Elasticsearch is based on java.Let’s install Elasticsearch:
- Following command installs the dependencies
sudo apt install apt-transport-https ca-certificates gnupg2 -y - We will get the GPG key; for that, we will use the below command,
wget -qO - https://artifacts.elastic.co/GPG-KEY-elasticsearch | sudo apt-key add - - We also need to add Elasticsearch repository. Run the command below to do so,
sudo sh -c 'echo "deb https://artifacts.elastic.co/packages/7.x/apt stable main" > /etc/apt/sources.list.d/elastic-7.x.list' - Now that we have everything, we will install Elasticsearch using the following commands,
sudo apt updatesudo apt install elasticsearch - Elasticsearch is now installed successfully. We can now enable the Elasticsearch service.
sudo systemctl enable elasticsearch.servicesudo systemctl start elasticsearch.service - Verify if the Elasticsearch is working fine,
curl -X GET "localhost:9200”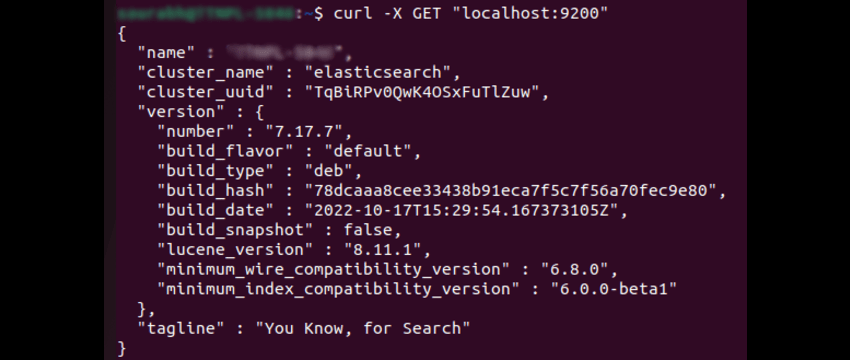
- Following command installs the dependencies
-
MySQL
- Let’s check whether MySQL is already installed or not using the following command, mysql -V
- If it is not installed, run the following command to install it,
sudo apt install mysql-server - Now that MySQL is installed, let’s configure it. But before we start with the actual configuration process, there are some steps which need to be performed for resolution of issues that occurs during the configuration process.
- Login into MySQL with root user,
sudo mysql - We will be changing the authentication method for the root user using the ALTER command. Make sure to replace the “password” with the actual password in the below command.
ALTER USER 'root'@'localhost' IDENTIFIED WITH mysql_native_password BY 'password'; - We need a MySQL user with all privileges for the Magento site. So, we will login again with root user, this time using the password we set in the previous step. (Make sure to replace the “password” with the actual password in the below command.)
CREATE USER 'magento'@'localhost' IDENTIFIED WITH mysql_native_password BY 'password';GRANT ALL PRIVILEGES ON magento.* TO 'magento'@'localhost'; - Exit MySQL terminal and now perform the below command to start with the mysql configuration process,
sudo mysql_secure_installation - We have successfully created the user and configured MySQL. We can now create the database. Login user the Magento user, and the password.
CREATE DATABASE magento;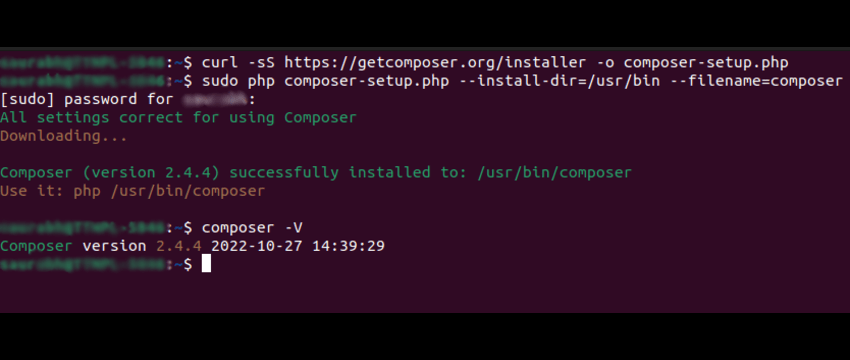
- Login into MySQL with root user,
Downloading Magento
We will be installing Magento 2.4.4 through composer, under the root directory (i.e /var/www/html) of the Apache server. To download Magento you will need access keys which you can get by creating an account on the Magento Marketplace.
After the account is created, create an access key(i.e public key and private key) following the below steps,
- Go to My Profile.
- Open Access Keys page, under the Marketplace tab.
- Click Create A New Access Key.
- Fill in the required details.
- And click Ok
We can now download Magento, starting by navigating to the Apache root directory,
cd /var/www/html
Run the below command to download,
sudo composer create-project --repository-url=https://repo.magento.com/ magento/project-community-edition=2.4.4 <magento_installation_directory>
When prompted for username and password, use the public key and private key respectively.
After the successful download, it requires some permission; use the following command to grant it,
find . -type f -exec chmod 644 {} \;
find . -type d -exec chmod 755 {} \;
find var pub/static pub/media app/etc generated/ -type f -exec chmod g+w {} \;
find var pub/static pub/media app/etc generated/ -type d -exec chmod g+ws {} \;
chown -R <user>:<group> .
chmod u+x bin/magento
Installing Magento
- Now that all the dependencies and prerequisites are in place. We can safely install Magento. While running the below command make sure you are at the magento_installation_directory (eg. /var/www/html/magento) directory created in the previous step.Feel free to change the values of the parameters according to your need.
php bin/magento setup:install --base-url=http://localhost.magento.com --db-host=localhost --db-name=<db_name> --db-user=<db_user> --db-password=<db_user_password> --admin-firstname=Admin --admin-lastname=Admin --admin-email=<admin_email> --admin-user=<admin_username> --admin-password=<admin_password> --language=en_US --currency=USD --timezone=America/Chicago --backend-frontname=admin --search-engine=elasticsearch7 --elasticsearch-host=localhost --elasticsearch-port=9200 - Add the following line in the /etc/hosts file,
127.0.0.1 localhost.magento.com
Install Venia sample data
We will install Venia sample data so that we can use it to configure our store in the AEM.
composer config --no-interaction --ansi repositories.venia-sample-data
composer https://repo.magento.com
composer require --no-interaction --ansi magento/venia-sample-data:*
bin/magento setup:upgrade
Verify Installation
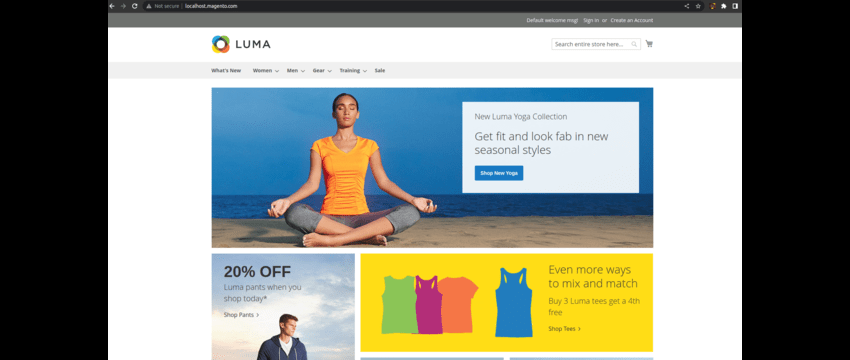
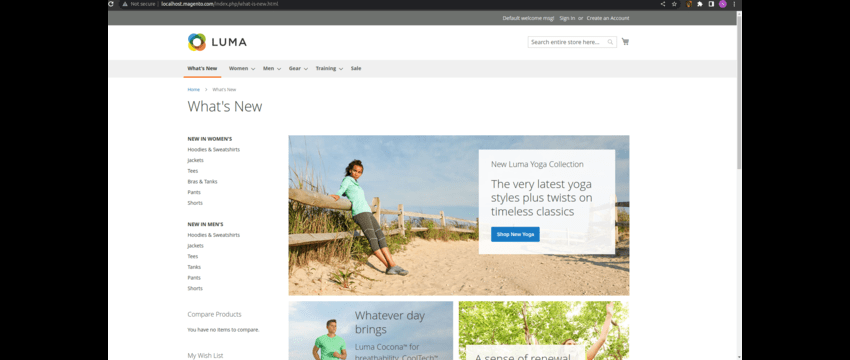
Open http://localhost.magento.com. Here is the final looking store,
Admin Panel
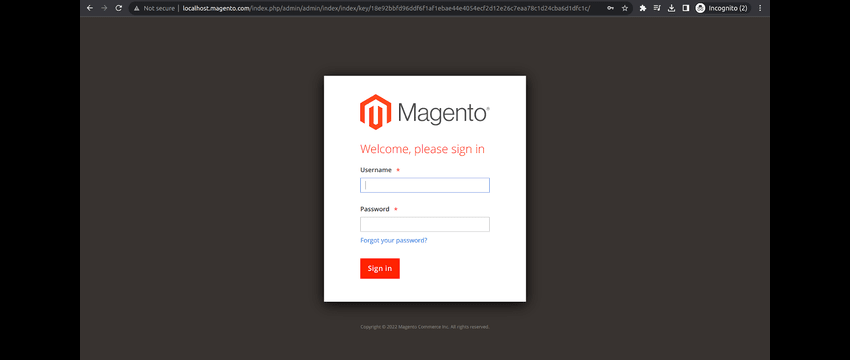
Access the Admin panel using the following URL http://localhost.magento.com/admin. It will
redirect you to a Login page as shown below, use the same credentials which you entered during the Installing Magento step.
--admin-user=<admin_username>
--admin-password=<admin_password>
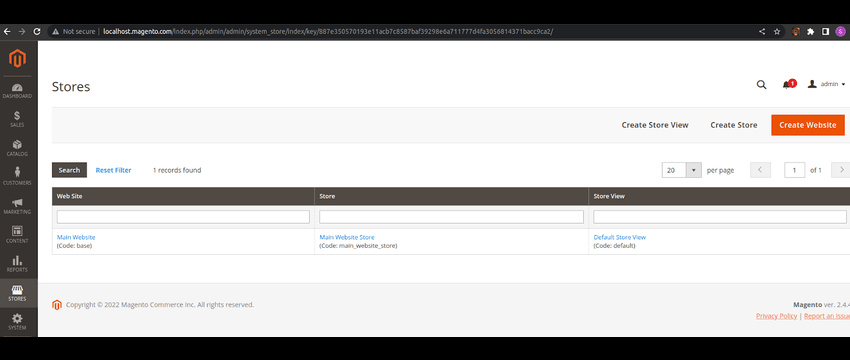
This is the store details page:
That’s all for this post, hope your local Venia store is up and running. Now that our
store is set up, in the upcoming blog, we will discuss how we can set up Adobe Experience Manager (AEM) and configure CIF Add-on.
Stay Tuned!
References: