Decoupled Architecture
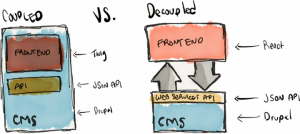
To understand the term “Decoupled” we need to understand what “Coupled” is. A coupled (also known as “traditional” or “monolithic”) CMS knits together the front- and back-ends. Working off the same application, developers and content managers make adjustments to the back-end while users interact with the front-end, but both are experiencing, viewing, and interacting with the same system.
While in a decoupled CMS, the front-end and back-end are separated. The CMS handles the back-end, and a delivery system handles the front with an application programming interface (API) that connects them for publishing.
Introduction to React & Drupal
React JS
React is a JavaScript library for building user interfaces. Started in 2013, React has quickly grown in popularity due to its declarative style and lack of assumptions about your technology stack. In the last few years, a large ecosystem has grown around React. This includes high-quality libraries, conferences, and increased demand for developers with React skills.
Drupal
Drupal is an open-source content management system with robust tools for modeling data, implementing editorial workflows, and coding custom application logic. There is also excellent support for JSON API or GraphQL web services, making it a good choice as the backend for your React application.
With a multitude of benefits, ReactJS has become a popular front-end framework. Unfortunately, embedding React into a Drupal site is not straightforward. In this article, I hope to show you one relatively simple method of how to do so.
The method I will demonstrate in this article makes a few assumptions that you know Drupal. Drupal 8/9 is already installed at your local. I won’t be demonstrating how to use React for a headless Drupal experience. Instead, I’ll be demonstrating what has been called a loosely-decoupled experience. This method’s approach will render your React app within a Drupal block. Another assumption is that we have a way of detecting our local environment. My example is one way, but there are other ways of doing this.
Let’s dig deeper into the technical details of how progressively decoupled apps can be created using React on a Drupal 8/9 website.
Why Opt For This Approach
With the increasing popularity of ReactJS, JavaScript libraries and frameworks prove to be useful in building complex applications by seamlessly getting embedded on a Drupal site, thus combining the robustness of an API-first CMS with a slick and quick React frontend to collectively give way to amazing digital experiences along with future-proof builds.
Don’t Use create-react-app
If you’re unfamiliar with create-react-app, it is a nice tool that generates scaffolding for a React application. It is also not great for building to React blocks that you plan to embed in Drupal since these React applications are less complex. For instance, you do not need the public folder that create-react-app provides, nor do you need many of its dependencies. Some of these can interfere with being able to use React developer tools and can cause other confusion too.
What to do
It is not very difficult to generate your react project with just the dependencies you need. First, decide where your React component will live in your codebase. I usually put it into a custom module because we need to write server-side code to embed the component. You could also put the React component into the theme.
What follows is a step-by-step method for creating a React app and integrating it to a Drupal custom module.
Step 1 : Create a custom module in Drupal
In your custom module folder (usually web/modules/custom) create a new folder for the custom module. Let’s call it react_example.
In the new folder, add an info.yml file to register your module. Since our module is react_example, this will be named react_example.info.yml.
Populate your info.yml file with at least the minimum information. Here’s an example:
name: 'React Example App'

type: module

description: 'React framework for Drupal 9.'

core_version_requirement: ^8.8.0 || ^9.0

package: 'React'
Step 2 : Create a basic react app
Now create js/react/ folder in this custom react_example module. I usually make a js/react/appname folder. Do this as you see fit, and move to that folder using the CLI. Then, let’s get started by initializing a new project.
npm init
This will generate a basic package.json and some scaffolding.
Next, you’ll want to set a node version. For this, I recommend nvm. You probably want the latest stable version of node.
npm install node

node -v > .nvmrc
Now it’s time to install the required packages. Here is a summary of what you’ll need:
| Package name | ID | Description | Dependency Type |
| Babel Core | @babel/core | Babel is a JavaScript transpiler that converts the JavaScript that you write (e.g. React) into JavaScript that can run in any browser. | dev |
| Babel CLI | @babel/cli | CLI package for Babel. | dev |
| Babel Preset Env | @babel/preset-env | The basic Babel JavaScript transpilation package | dev |
| Babel Preset React | @babel/preset-react | Babel transpilation for React JavaScript | dev |
| Babel Loader | babel-loader | Allows webpack to use Babel as a transpiler. | dev |
| Webpack | webpack | A tool for bundling JavaScript so that a browser can use it. | dev |
| Webpack CLI | webpack-cli | Allows npm to run webpack commands | dev |
| React | react | The React JavaScript library | prod |
| React Dom | react-dom | The entry point to the DOM for React | prod |
Dependency type refers to whether the module is needed for the actual production build that end users will be interacting with.
To install these packages, start with dev dependencies:
npm install --save-dev @babel/cli @babel/core @babel/cli @babel/preset-env @babel/preset-react babel-loader webpack webpack-cli
Then, install production dependencies
npm install react react-dom
Step 3: Add a webpack config
If you’ve worked with React before, you’ve likely used webpack to build your project. The webpack config needed here is pretty basic:
const path = require('path');
const config = {
  entry: './src/index.js',
  devtool: (process.env.NODE_ENV === 'production') ? false : 'inline-source-map',
  mode: (process.env.NODE_ENV === 'production') ? 'production' : 'development',
  output: {
    path: path.resolve(__dirname, 'dist'),
    filename: 'app.bundle.js'
  },
  module: {
    rules: [
      {
         test: /\.js$/,
         exclude: /(node_modules)/,
         use: {
           loader: 'babel-loader'
         }
      }
   ]
 },
};

module.exports = config;
This goes in a file called webpack.config.js. I’ll explain the important parts:
Entry : In webpack, the entry point is the file that imports all of your other packages, at the top of your application’s tree. If you’re dealing with React, this is the file where you use react-dom to attach your react script to a DOM element.
Devtool : We tell the bundle to use a source map based on whether we’re doing a production or development build. This bloats the bundle a lot, so you don’t want to add a source map to the prod build. The NODE_ENV comparison comes into play later when we have npm run our webpack script.
Output : The path to your bundle, containing the whole app (e.g., all the React components and imports you need). Usually, this is in a “dist” folder.
Module : This tells webpack to use babel for transpiling your JS so that the browser can run React.
There are two things you need to do:
Set up your scripts
You’ll need to add the following to the top level of package.json:
"scripts": {
"build": "NODE_ENV=production webpack",
"watch": "webpack --watch --progress"
},
This tells webpack to either do a development (watch) or a production (build) build. As we noted earlier, we use an environment variable to establish whether to use a source map (which bloats the package but facilitates debugging).
Set up Babel
Another role that package.json plays is to let you configure how Babel works. You have to add this:
"babel": {

"presets": [

[

"@babel/preset-env",

{

"targets": {

"browsers": [

"IE >= 11",

"last 3 versions"

]

}

}

],

"@babel/preset-react"

]
Step 5 : Build a “Hello World” React App
Below is a simple React app that will let you test things. Put this in src/index.js:
import React from 'react';

import { render } from 'react-dom';

const Root = () => {

return (

<>Hi there</>

)

}

render(<Root/>, document.querySelector('#my-app-target'));
Step 6 : Define a library for React app in Drupal
In our react_example module, create a react_example.libraries.yml file with this content:
my-app:

version: 1.x

js:

js/react/my-app/dist/app.bundle.js: { minified: true }
We have multiple ways to attach this library in drupal, which is mentioned in step 7.
Step 7 (A): Include on twig template
Include the React app’s target markup on a page / Include the React app’s Drupal library on a page
This will let us load the library in an #attached property or in a Twig template.
There are quite a few ways to do this. I think the absolute simplest way is to put the following in the twig template where you want to load your React app:
{{ attach_library('react_example/my-react-app') }}

<div id="my-app-target"></div>
If we do this, the React app will put itself within the my-app-target div.
Step 7 (B): Include on the form element
You can also use a render array to embed the app if you want to do things from a form alter for instance:
$form['my_react_app'] = [

  '#markup'=> '<div id="my-app-target"></div>',

  '#attached'=> [

    'library'=> [

      'mymodule/my-react-app'

    ],

  ],

];
Step 7 (C): Create a custom block
Let’s start by creating a file in our custom module at src/Plugin/Block/ReactExampleBlock.php
In the build method of our block class, we will create an empty container with the default ID (root) for mounting the React app. To that container, we’ll attach our custom library.
<?php

namespace Drupal\react_example\Plugin\Block;

use Drupal\Core\Block\BlockBase;

/**

* Provides a 'ReactExampleBlock' block.

*

* @Block(

* id = "react_example_block",

* admin_label = @Translation("React Example Block"),

* )

*/

class ReactExampleBlock extends BlockBase {

/**

* {@inheritdoc}

*/

public function build() {

$build = [];

$build[] = [

'#type'=> 'container',

'#attributes'=> [

'id'=> 'root',

],

'#attached'=> [

'library'=> [

'react_example/react_example_dev',

],

],

];

return $build;

}

}
At this point, you should be able to add your new block to a page and see the default content, saying “Edit src/App.js and save to reload.” If you see this message, you’ve successfully attached the React app to your Drupal block and can continue development.
Step 8: Run npm
If you are following this as a tutorial, this is a good time to test things out. First, let’s test a production build:
Run the below command in your react app
npm run watch
OR
npm run build
In the browser, load the page that is running your twig template or block from the 7 step. You should see the “Hi there” text in the target div.
Conclusion
I hope this post has helped you add an embedded Progressively Decoupled React App to your Drupal 8/9 site!