Hi Guys,
In this artical we learn how to integrate SwaggerUI with spring boot application.
Basically ‘SwaggerUI’ is used to serves documentation of an REST API and another most powerfull feature is, it provides a way to enable developer to play around the REST API without having write any code.
Steps to Integrate SwaggerUI :-
1. First of all we need to add swagger dependency in our spring boot application.
if you are using gradle as build tool then you need to add following dependency in your build file
'com.mangofactory:swagger-springmvc:1.0.2'
and for maven project you need to add following dependency in our build xml file:-
<dependency> <groupId>com.mangofactory</groupId> <artifactId>swagger-springmvc</artifactId> <version>1.0.2</version> <dependency>
2. Then we need to add a java class that enables the swagger into action.
[code]
package com.intelligrape.com.config;
import com.mangofactory.swagger.configuration.SpringSwaggerConfig;
import com.mangofactory.swagger.models.dto.ApiInfo;
import com.mangofactory.swagger.plugin.EnableSwagger;
import com.mangofactory.swagger.plugin.SwaggerSpringMvcPlugin;
import org.springframework.beans.factory.annotation.Autowired;
import org.springframework.boot.autoconfigure.EnableAutoConfiguration;
import org.springframework.context.annotation.Bean;
import org.springframework.context.annotation.Configuration;
@Configuration
@EnableSwagger
@EnableAutoConfiguration
public class SwaggerConfig {
private SpringSwaggerConfig springSwaggerConfig;
@Autowired
public void setSpringSwaggerConfig(SpringSwaggerConfig springSwaggerConfig) {
this.springSwaggerConfig = springSwaggerConfig;
}
@Bean
public SwaggerSpringMvcPlugin customImplementation() {
return new SwaggerSpringMvcPlugin(this.springSwaggerConfig)
.apiInfo(new ApiInfo(
"SWAGGER DEMO WITH SPRING BOOT REST API",
"This API is for swagger demo person analysis.",
null,
null,
null,
null
))
//Here we disable auto generating of responses for REST-endpoints
.useDefaultResponseMessages(false)
//Here we specify URI patterns which will be included in Swagger docs. Use regex for this purpose.
.includePatterns("/swagger-demo/.*");
}
}
[/code]
Note: you have to add swagger configuration class in the application classpath so that it will be scan by compiler at run time.
3. After the configuration file is done we can jump on to Controllers.
[code]
package com.intelligrape.com.person
import com.wordnik.swagger.annotations.Api
import com.wordnik.swagger.annotations.ApiOperation
import com.wordnik.swagger.annotations.ApiResponse
import com.wordnik.swagger.annotations.ApiResponses
import org.springframework.http.HttpStatus
import org.springframework.http.MediaType
import org.springframework.http.ResponseEntity
import org.springframework.web.bind.annotation.*
/**
* Created by Ashu on 2/7/15.
*/
@Api(basePath = "swagger-demo/person", value = "Person", description = "Operations with person", produces = "application/json")
@RestController
@RequestMapping(value = "swagger-demo/person", produces = MediaType.APPLICATION_JSON_VALUE)
class PersonController {
@RequestMapping(method = RequestMethod.POST, value = "/create")
@ResponseStatus(HttpStatus.NOT_FOUND)
@ApiOperation(value = "Get Person", notes = "Fetch List of Person")
@ApiResponses(value = [
@ApiResponse(code = 400, message = "Fields are with validation errors"),
@ApiResponse(code = 201, message = "List"),
@ApiResponse(code = 500, message = "Error occurred while fetching Person")
])
ResponseEntity create(@RequestBody PersonCO co) {
return new ResponseEntity(new Person(firstName: co.firstName, lastName: co.lastName, age: co.age), HttpStatus.OK)
}
}
[/code]
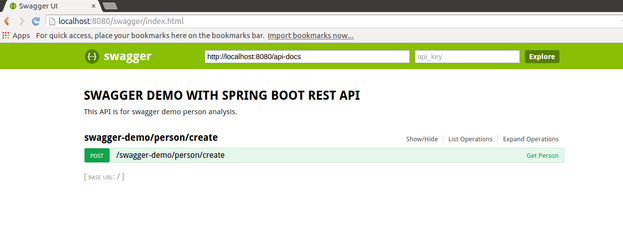
4. Lastly we need to add swagger UI plug. you can Download swagger ui from its official git repoAfter that extract it and copy dist directory and paste it in folder /public or /static or /resources located in src/java/resources. Now start the application and navigate to
http://localhost:8080/swagger/index.html
You have in screen something like this :-
Hope this helps 🙂
Can I get to download the whole sample?
Getting org.springframework.beans.factory.BeanCreationException: Could not autowire method: public void com.groundspeed.commons.config.SwaggerConfig.setSpringSwaggerConfig(com.mangofactory.swagger.configuration.SpringSwaggerConfig);
Any Idea why?
Could you please share the source code?
This is great example. Worked for me.Few modification in steps which you mentioned for user’s who are new to swagger
Once Step 4 is done and application up, browse-
localhost:8080/index.html — this will show you default swagger page where you need pass
localhost:8080/api-docs as URL in text box and click Explore
Now you can see all api’s which you have mentioned with @Api on controller classes.
Cheers 🙂